
티스토리 뷰
NextAuth란?
NextAuth는 Next.js 애플리케이션에서 손쉽게 사용자 인증을 설정할 수 있는 패키지이다. Github, kaka, Google, Facebook, Credentials 등의 옵션을 제공해준다.
이 글은 Credentials을 통한 로그인 / 로그아웃 방법에 대한 포스팅이다.
Credentials은 사용자로부터 아이디와 비밀번호를 받아 백엔드 서버를 통해 인증하는 것이다.
사용하려는 이유
상태 관리 라이브러리인 zustand를 통해 로컬 스토리지에 저장하여 로그인 상태를 관리하였다. 이렇게 하면 문제점이 있는데 로컬스토리지는 브라우저에서 작동을 하기 때문에 hydration이 일어나게 된다. 그렇게 되면 hydration을 통해 로그인 상태를 받아오는데까지 시간이 걸려 깜빡임이 생기게 된다. 유저 경험에 별로 좋지 않기 때문에 방법을 찾아보다가 session을 서버측에 저장할 수 있는 NextAuth를 사용하게 된 것이다.
사용법
1. NextAuth 설치
> npm install next-auth
2. NextAuth 설정
.env 파일에 NEXTAUTH_URL과 NEXTAUTH_SECRET을 추가해준다.
NEXTAUTH_URL은 배포 주소 (현재는 local)
NEXTAUTH_SECRET는 secret에 사용된다.
# Next auth
NEXTAUTH_URL=http://localhost:3000
NEXTAUTH_SECRET=9c43d19118e6ce4302118af3371
프로젝트 전역에서 로그인 상태값을 공유할 수 있도록 Provider를 설정해줘야한다.
provider.tsx 파일을 생성한 후 다음과 같이 설정한다.
"use client";

import { SessionProvider } from "next-auth/react";

type Props = {
  children?: React.ReactNode;
};

export const NextAuthProvider = ({ children }: Props) => {
  return <SessionProvider>{children}</SessionProvider>;
};
그 후 최상위 layout 파일에 다음과 같이 입력해준다.
import "./_styles/globals.css";
import { Metadata } from "next";
import Navigation from "./_components/navigation";
import { NextAuthProvider } from "./provider";

export const metadata: Metadata = {
  title: {
    template: "%s | Next.js 14 Learn",
    default: "Next.js 14 Learn",
  },
  description: "Generated by Next.js",
};

export default function RootLayout({ children }: { children: React.ReactNode }) {
  return (
    <html lang="en">
      <body>
        <NextAuthProvider>
          <Navigation />
          {children}
        </NextAuthProvider>
      </body>
    </html>
  );
}
그럼 이제 전역에서 로그인 상태 값을 사용할 수 있다.
다음으로 app 폴더 내에 /api/auth/[...nextauth] 폴더를 생성후 route.ts 파일을 생성 후 다음과 같이 입력해준다.
import NextAuth from "next-auth/next";
import CredentialsProvider from "next-auth/providers/credentials";
import { login } from "../../login";

// NextAuth 구성 옵션
export const authOptions = {
  secret: process.env.NEXTAUTH_SECRET, // 암호화에 사용될 시크릿 키
  providers: [
    // CredentialsProvider를 사용하여 사용자 인증 설정 (id + pw)
    CredentialsProvider({
      name: "Credentials",
      credentials: {
        id: { label: "id", type: "text", placeholder: "id" }, // ID 입력 필드 구성
        pw: { label: "pw", type: "password" }, // 비밀번호 입력 필드 구성
      },

      // 로그인 실행
      async authorize(credentials, req) {
        const params = {
          id: credentials?.id,
          pw: credentials?.pw,
        };
        const res = await login(params); // 로그인 함수 호출
        console.log(res); // 로그인 결과 출력
        if (res) {
          return res; // 로그인 성공 시 결과 반환
        } else {
          return null; // 로그인 실패 시 null 반환
        }
      },
    }),
  ],
  // 커스텀 로그인 페이지 사용
  pages: {
    signIn: "/login", // 로그인 페이지 경로 설정
  },

  callbacks: {
    // JWT 콜백: 토큰 수정
    async jwt({ token, user }: any) {
      return { ...token, ...user };
    },

    // 세션 콜백: 세션 설정 및 사용자 정보 추가
    async session({ session, token }: any) {
      session.user = token as any; // 세션에 사용자 정보 추가
      session.user.name = token.id; // 사용자 이름 추가 (여기서는 ID로 설정)
      return session; // 세션 반환
    },
  },
};

const handler = NextAuth(authOptions); // NextAuth 핸들러 생성

// 핸들러를 GET 및 POST로 내보냄
export { handler as GET, handler as POST };
그럼 이제 로그인 페이지에서 로그인을 구현해보도록 하자
NextAuth에서는 /api/auth/signin url을 통해 기본적인 로그인 폼을 제공해준다. 하지만 나는 내가 만든 로그인 페이지가 있어서 pages에 커스텀 로그인 페이지를 설정해주었다.
Login.tsx 파일을 다음과 같이 작성해준다.
"use client";

import { signIn } from "next-auth/react";
import { useRouter } from "next/navigation";
import { useState } from "react";
import style from "../_styles/login.module.css";

export default function Login() {
  const router = useRouter();
  const [id, setId] = useState("");
  const [pw, setPw] = useState("");
  const [isInvalid, setIsInvalid] = useState(false);

  const handleSubmit = async (e: any) => {
    e.preventDefault();
    const res = await signIn("credentials", { id, pw, redirect: false }); // NextAuth의 signIn 함수를 사용하여 로그인 시도
    if (res?.ok) {
      router.push("/");
      router.refresh();
    }

    if (res?.status === 401) {
      setIsInvalid(true);
    }
  };

  return (
    <div className={style.container}>
      <div className={style.box}>
        <h4>Login</h4>
        <span>test 계정으로 로그인하실 수 있습니다.</span>
        <form>
          <div>
            <input
              type="text"
              id="id"
              name="id"
              autoFocus
              value={id}
              onChange={(e) => setId(e.target.value)}
              placeholder="test"
            />
          </div>
          <div>
            <input
              type="password"
              id="pw"
              name="pw"
              value={pw}
              onChange={(e) => setPw(e.target.value)}
              placeholder="1234"
            />
          </div>
          {isInvalid && <b>유효하지 않은 ID입니다.</b>}
          <button
            type="button"
            onClick={(e) => {
              handleSubmit(e);
            }}
            className={style.btn}
          >
            Login
          </button>
        </form>
      </div>
    </div>
  );
}
NextAuth에서 제공하는 signIn 함수를 통해 route.ts 파일에 있는 credentials에 authorize 함수가 실행된다.
로그인 성공 후 refresh를 한 이유는 새로고침 하지 않으면 클라이언트 측에 반영이 안되기 때문에 해주었다.
로그인에 성공하면 session에 값이 저장되는 것을 확인할 수 있다.
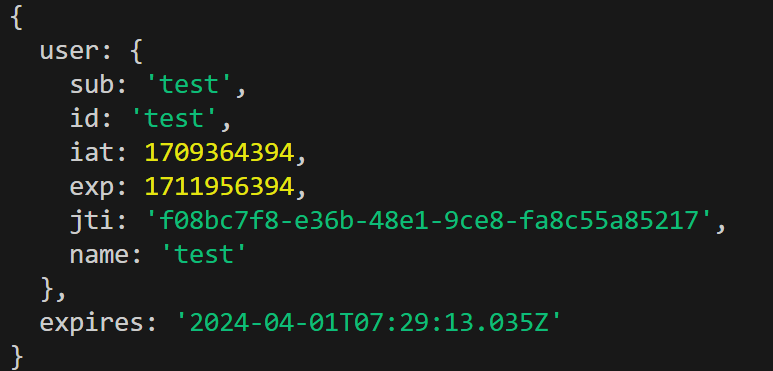
이제 이 값을 통해 로그인 여부를 판단해보자
서버 컴포넌트에서 사용
NextAuth에서 제공하는 getServerSession을 통해 authOptions에 지정된 설정을 기반으로 서버 측에서 해당 세션에 대한 사용자 정보를 확인하고 필요한 작업을 수행할 수 있다. 즉 서버컴포넌트에서 사용 가능하다.
navigation 바에서 사용자의 로그인 여부에 따라 UI를 설정해주도록 하자
user 변수에 서버측에서 불러온 session 값을 저장해준다. (로그인이 되어있지 않다면 null값을 반환함)
import Link from "next/link";
import style from "../_styles/navigation.module.css";
import { getServerSession } from "next-auth";
import { authOptions } from "../api/auth/[...nextauth]/route";
import SignButton from "./sign-button";
export default async function Navigation() {
  const user = await getServerSession(authOptions);
  // console.log("nav:", user);

  return (
    <nav className={style.nav}>
      <ul>
        <li>
          <Link href="/">Home</Link>
        </li>
        <li>
          <Link href={`/user/${user?.user.name}`}>{user?.user.name}</Link>
        </li>
        <li>
          <SignButton user={user} />
        </li>
      </ul>
    </nav>
  );
}
이제 SignButton 컴포넌트를 통해 로그인 여부에 따라 로그인, 로그아웃 버튼을 보여주도록 한다.
"use client";

import { signOut, useSession } from "next-auth/react";
import Link from "next/link";

export default function SignButton({ user }: any) {
  if (user === null) {
    return <Link href="/login">login</Link>;
  }
  return <a onClick={() => signOut()}>logout</a>;
}
signOut 함수를 통해 로그아웃을 할 수 있다.
결과 화면
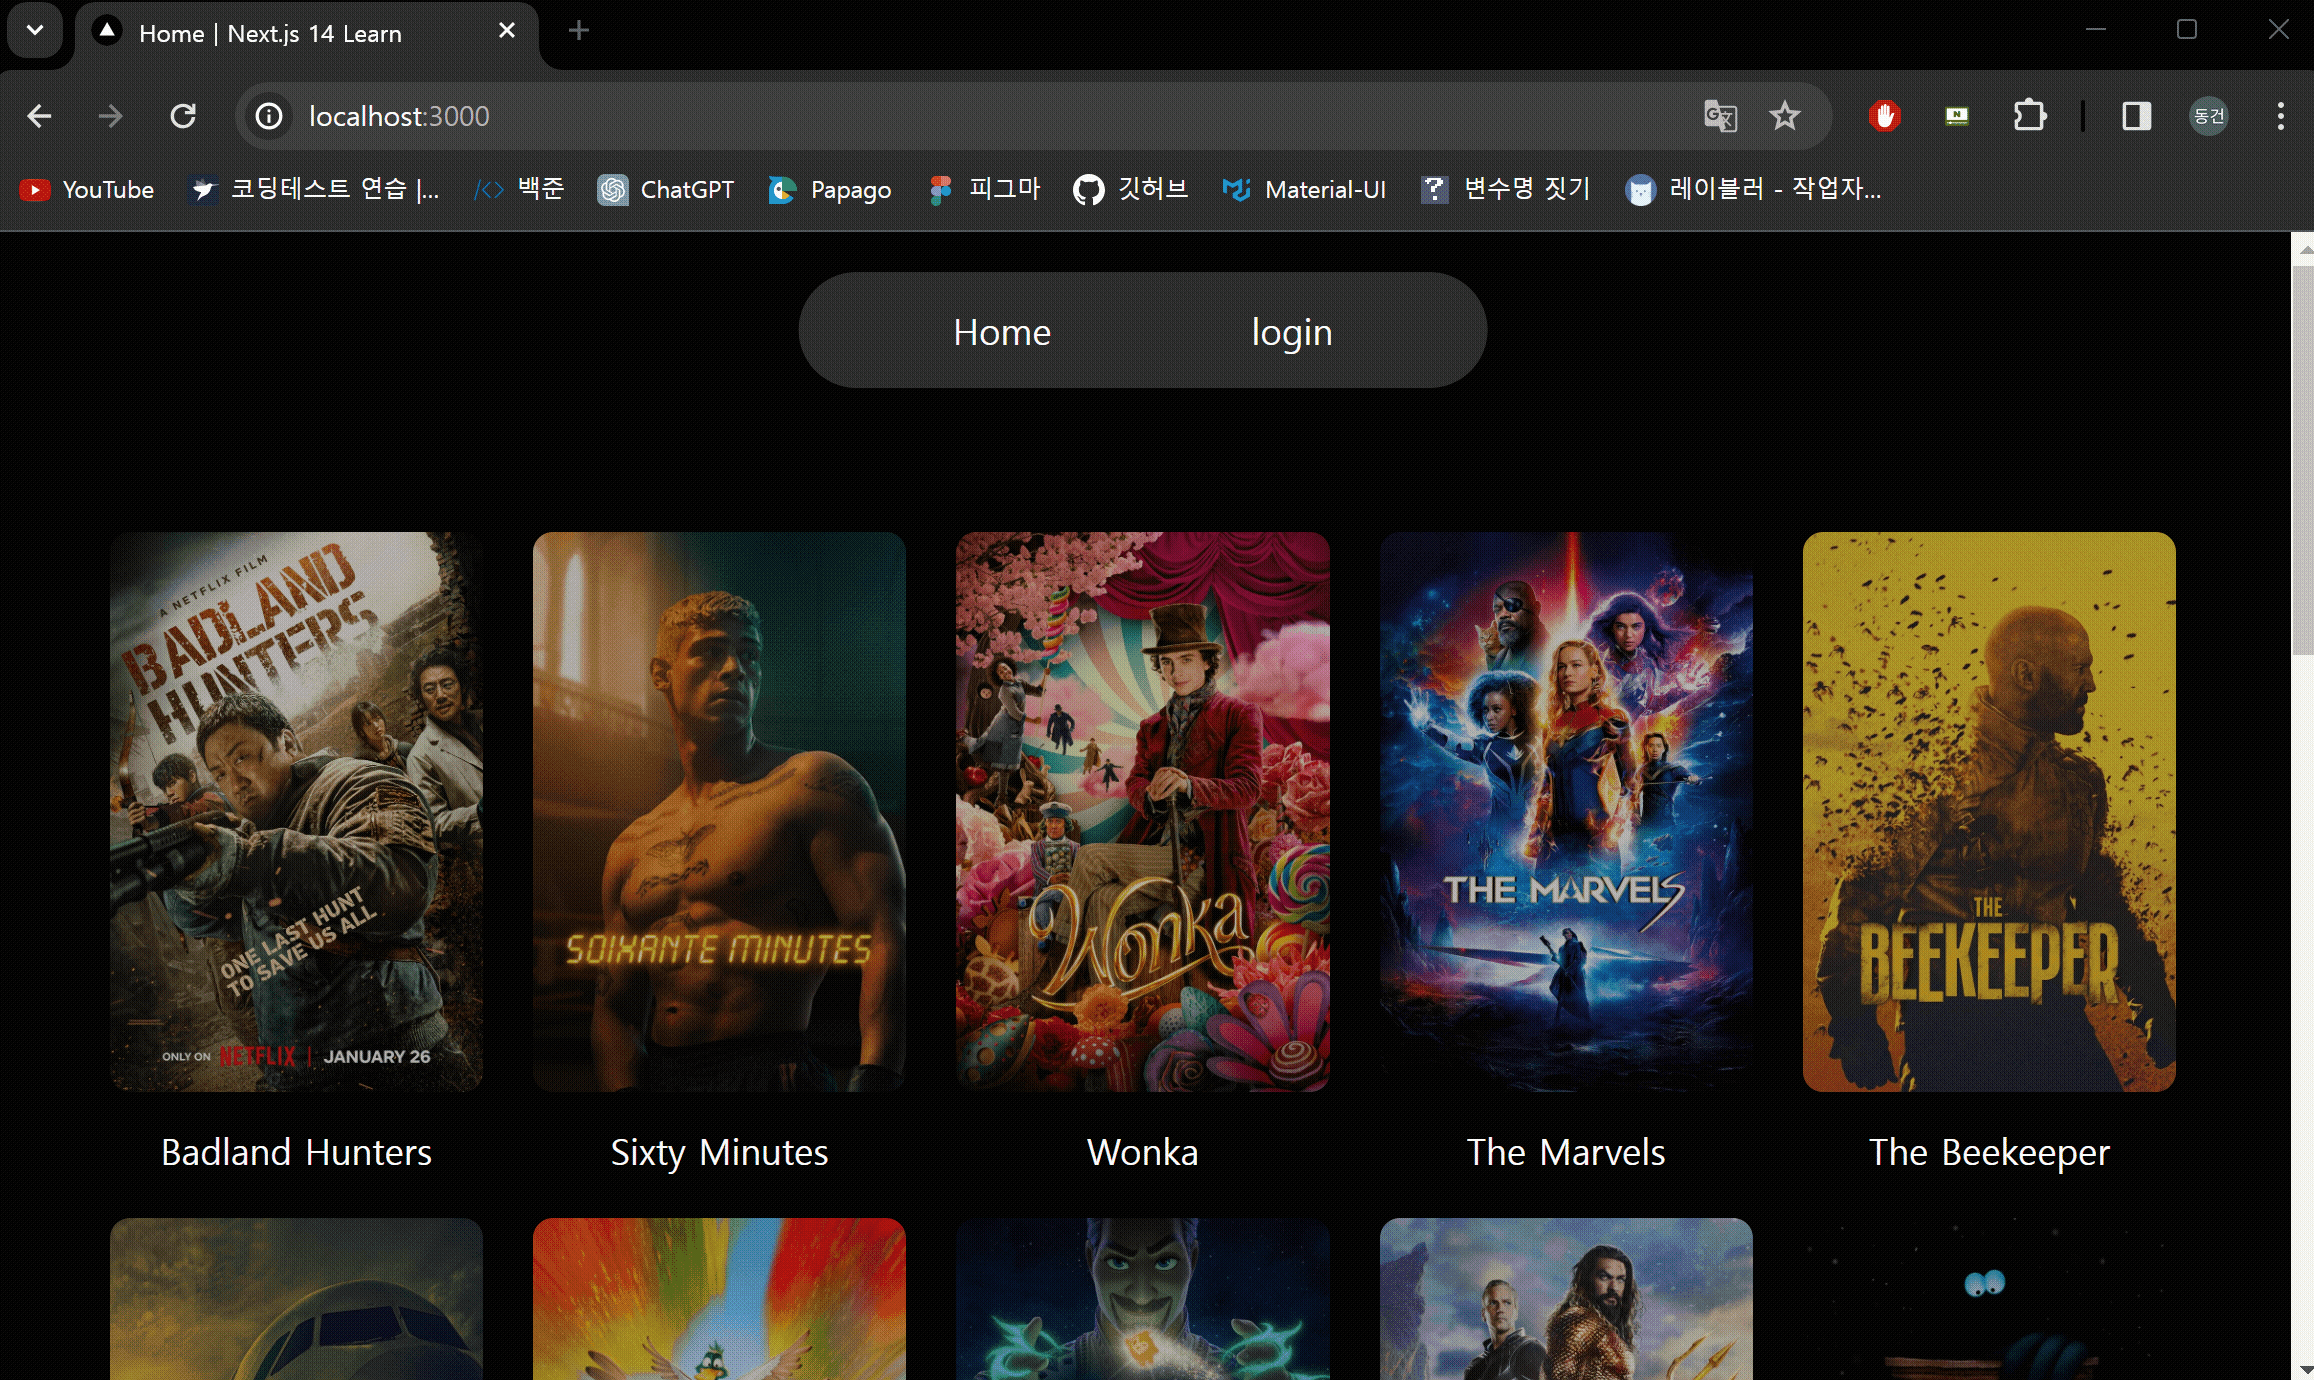
로그인 후 새로고침 해도 login이 아닌 logout이 바로 보이는 걸 확인할 수 있다.
'Next.js' 카테고리의 다른 글
| [Next.js] Next.js에서 Zustand 라이브러리를 활용한 상태 관리 (0) | 2024.03.08 |
|---|---|
| [Next.js] Next.js에서 zustand 사용하기 (1) | 2024.02.26 |
| [Next.js] Next.js 14 revalidatePath (1) | 2024.02.24 |
| [Next.js] Next.js 14 revalidateTag (0) | 2024.02.18 |
| [Next.js] Next.js 14 Server Side Data Fetching (0) | 2024.02.17 |
- Total
- Today
- Yesterday
- revalidatePath
- useCallback
- useoptimistic
- useQuery
- NextAuth
- 해시를 사용한 집합과 맵
- stompjs
- react-three-fiber
- 24431
- rc-dock
- 25329
- useMemo
- 9575
- eventemitter3
- Next.js
- sepolia
- react-query
- react19
- useMutation
- React.JS
- 백준
- revalidateTag
- js
- baekjoon
- RefreshToken
- 4659
- 20551
- react-quey
- React
- zustand
| 일 | 월 | 화 | 수 | 목 | 금 | 토 |
|---|---|---|---|---|---|---|
| 1 | 2 | 3 | 4 | 5 | ||
| 6 | 7 | 8 | 9 | 10 | 11 | 12 |
| 13 | 14 | 15 | 16 | 17 | 18 | 19 |
| 20 | 21 | 22 | 23 | 24 | 25 | 26 |
| 27 | 28 | 29 | 30 | 31 |